NFTs are very popular and involve a lot of money. That’s why you might think you’re taking a piece of the cake and making and selling an NFT yourself to make money with it. This step-by-step guide shows you how it works.
Making your onw NFT – step-by-step guide
Choose a subject
An NFT is a digital file that you may know mainly from drawings. If drawing isn’t your thing, you can still make an NFT. For example, you can make an NFT from a music file, a video, an animation, photos, etc.
You can make a standalone NFT, a single picture, but what better sells are collections. If you mainly take photos, you can create a collection around a specific subject.
A well-known example is the Bored Apes Yacht Club NFT collection. This is a series of pictures with bored-looking monkeys where the fur, hat, clothes,… vary. Millions are involved in this NFT and many famous people have already bought one.
Another factor in the sale is whether the NFT can also be used or whether it is “just” a nice picture. If you can give a utility to your NFT, it can increase its value. Some examples: to be used in a game, to stake in exchange for extra crypto, to have control over the project, to be able to make extra purchases only for those who own the NFT, belong to a club (organize online and offline meetings),…
So you can just make a separate digital file like I did to test how it works. If you really want to earn good money with it, you can think about this more deeply and develop a collection.
Make your art
As I mentioned, an NFT is a digital file that can encompass all sorts of things. If you make a painting, you can digitize it by taking a photo, if you make drawings by hand, you can scan it and possibly vectorize it with, for example, Illustrator.
- Photos
- Drawings: Illustrator, Affinity photo
- Artworks: photo of the artwork, digital artwork with Photoshop, Affinity Photo, …
- Music
- Animations
- Video
- Parts of a game (skins, utensils, shield, clothing,…)
- Memes
- Virtual clothing for the metaverse (large companies such as Nike also jump in on this)
I know a few artists who I think would make an NFT of their works (if they also do the marketing) they could make good money from this. Their work is beautiful.
What is very important if you are going to make the NFT art is that you own the rights to the subject. So you cannot make use of someone else’s music or use copyrighted images for making your own NFT.
Choose a marketplace
There are several NFT marketplaces where you can make and sell the NFT. The most famous is OpenSea which runs on the Ethereum network. There are several marketplaces via Ethereum, but in addition, the NFT can also run on another network such as Solana.
The advantage of Ethereum is that it contains the most sales. The downside, however, is that Ethereum gas fees are very high. You pay such a gas fee not only when you buy an NFT, but also when you make and sell one. Meanwhile, at the popular OpenSea, you can choose not to go through the Ethereum network, but through Polygon. This means you don’t have to pay any fees.
With other networks, you also pay a fee, but this is only a fraction of the price you pay on the Ethereum blockchain.
Some marketplaces where you can create and sell NFTs:
- OpenSea
- Rarible
- SuperRare (requires artist approval)
- Solsea
- Solanart (you must submit an application for this)
- Mintable
- Makersplace
- Foundation
Create a wallet
You will have to connect a wallet to the marketplace in order to make your sale. You have to take into account the type of wallet. If you use the Solana network, you must use a Solana wallet, and the same for Ethereum.
At your chosen marketplace you can already look which wallets that platform supports.
With OpenSea, for example, you can use MetaMask, Coinbase Wallet, WalletConnect, Formatic, Kaikas, Bitski, Venly, Dapper, Authereum, Torus, Portis, OperaTouch, and Trust. So a lot of choices, but the most used is MetaMask.
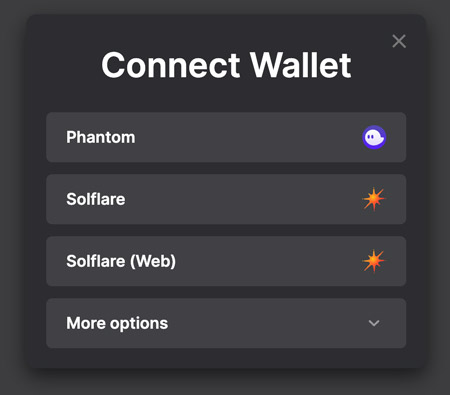
With SolSea, on the other hand, you will notice that the choice of wallets is different, namely Phantom, Solflare, Slope, Coin98, Sollet, Torus, Ledger.
So choose a wallet and create it. In our Phantom wallet tutorial and Solflare wallet tutorial, you can see how you can do that.
Provide your wallet with the right cryptocurrency
You are not going to buy an NFT, but you are going to make and sell it. You still need money to pay the so-called gas fee.
If you are going to sell on a marketplace that runs on the Ethereum network, you will need Ethereum in your wallet. If you sell through a marketplace that runs on the Solana blockchain, you need the cryptocurrency SOL to pay.
How do you get that particular coin into your wallet? To do this, you can first purchase the relevant coin through a crypto exchange or broker. You can then request your wallet address in your wallet (MetaMask, Phantom, …) where you can send the money.
You will also see a QR code that you can easily scan with your mobile. You can then send your coin to that address. A little later you will notice that the money is no longer in your wallet of the exchange or broker, but has been moved (minus the costs) to your wallet that you want to connect to the marketplace.
Connect your wallet with the marketplace
Connection your wallet is very simple. Most marketplaces have a clear button to connect your wallet. Usually, you have several choices. Select the wallet you have created. All you have to do is log in to your wallet and the marketplace will be connected to your wallet and can use the cryptocurrencies on it.
Create an account
Once your wallet is connected, you can create an account on the relevant platform. Your account name can also be seen at the NFTs that you sell.
Make the NFT
On the chosen platform you can click on “Create”. You can then follow the steps to create your NFT. A little later in the article, we’ll show you step-by-step how to do that on SolSea.
You can first create a collection. Multiple items can then be placed in such collections. The collection, therefore, contains artworks that belong together. You can indicate how many versions there are of the artwork. In most cases that will be 1 so that it is a completely unique item. But you can also choose to sell 10 versions of that work.
You give your work a name and a description. You can also add a URL where people can read more information about your project. If you’re also going to sell your NFT, you can set an amount for this. You can also determine which royalties you want to receive as soon as your NFT is sold on. If it changes hands 10 times, you will receive 10 times the royalties.
Once you have finished creating your NFT, it will be added to the blockchain. There can now be no more discussion about who owns and creates. As soon as you sell the work, you remain the creator, but the digital file changes owner. This owner can in turn resell it to someone else. You will then receive royalties on this.
Create and sell NFT on Solsea
Connect your wallet
Open Solsea and connect your wallet. When making my NFT I use Solflare for this, but I notice that Phantom wallet works better.
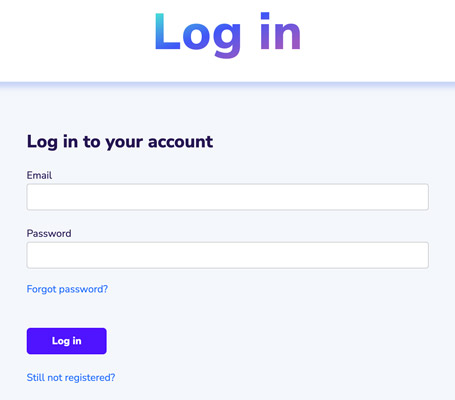
Log in on Solsea
If you already have a login on SolSea, you can now log in. If you don’t have a login yet, click on “Still not registered?” under the button. You can then create a log-in.
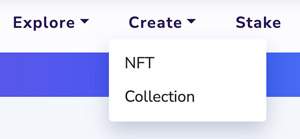
Create collection
If you want to create a separate NFT, click on “Create – NFT”.
If you want to merge several NFTs into a collection, click on “Create collection”.
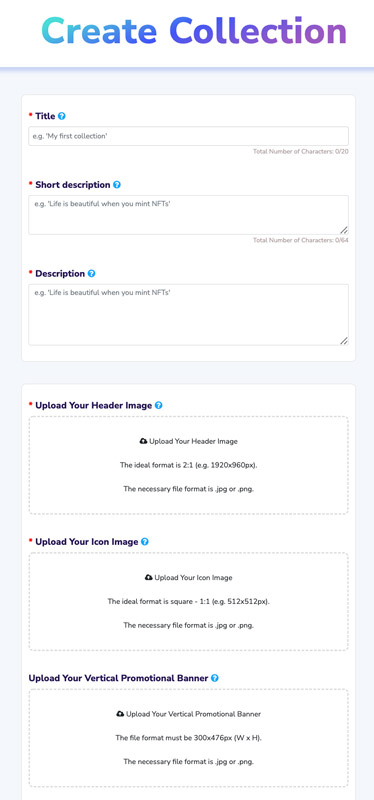
You will now see a form to fill in all your data about the collection.
- Title: title of your collection (maximum 20 characters)
- Short description: a short description (maximum 64 characters) – this description is also placed on the blockchain so you cannot change it afterwards. So make sure this is correct the first time.
- Description: this may be a longer description. This can also be seen in your collection. You can adjust this later if necessary.
- Upload your header image: the main photo that can be seen with your collection. The recommended size is 1920 x 960 pixels.
- Upload your icon image: ideal size is 512 x 512 px
- Upload your vertical promotional banner: 300 x 476 px: may be shown with a promotion
- Upload your horizontal promotional banner: 476 x 300 px: may be shown with a promotion
- Tags: You can select multiple tags from a list. If someone searches based on tags, your collection can appear based on these tags.
- Collection symbol: this is a short 8 letter word that symbolizes your collection.
- NSFW: If your collection contains explicit images.
- Collection supply
- Discord
- Telegram
- Website
This is quite a list, but only the first 5 items are required fields to continue.
If you want your collection to appear on the agenda of the upcoming collections, you have a few more things to mention.
- Collection supply: the number of NFTs in your collection
- Minting date
- Collection NFT initial price
Once you have filled in everything you want to fill in, click on “create collection”. Your collection has now been created.
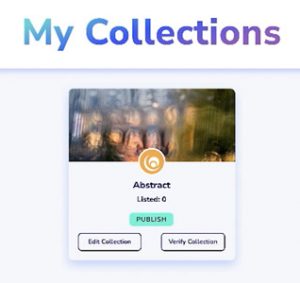
Click here on “Edit collection” then you can edit everything above except the title and the short description.
Collection verification
If you click on “Verify Collection” you can verify it. This is not mandatory to start selling your NFT, but if you do, your collection will indicate that it has been verified.
You must provide personal information so that Solsea can get in touch with you. You must also provide proof that you are the author of the work. For this, you can provide a link to a Cloud storage service (e.g. Google Drive) where you have files that show that you have made it (e.g. the original PSD or AI file).
Create NFT
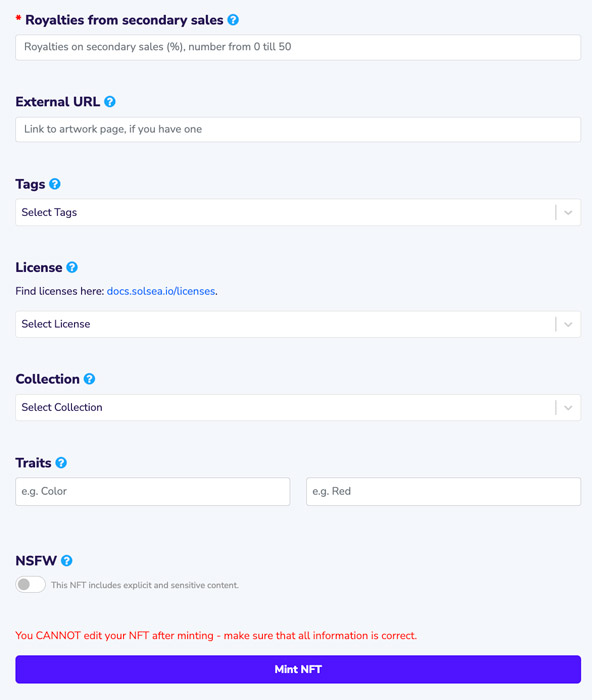
Now that your collection has been created, you can start making NFTs that will be added to your collection. To do this, go to “Create – NFT”. Here you have to enter all the information about your NFT.

- Upload static preview: this will be shown in the overview of NFTs.
- Upload animated preview: this is only necessary if you want to make an NFT from a video. This will be shown on the individual page of the NFT. If you don’t upload anything here, the static preview will be shown.
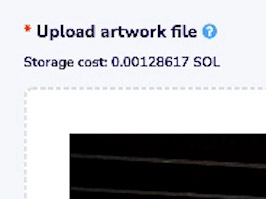
- Upload artwork file: this is the original file that will only be accessible to the owner of the NFT. So this can be the largest file size of your image while the preview uploads a smaller file. Here you can upload the following file formats: jpeg, png, gif, mp4, mov.
- Title: the title of your (art)work (maximum 20 characters)
- Short description: a short description (maximum 64 characters) – this description is also placed on the blockchain so that you cannot change it afterwards. So make sure this is correct the first time.
- Description: this may be a longer description. This can also be seen with your NFT.
- Royalties from secondary sales: here you can specify the percentage you would like to receive if someone else resells your NFT.
- External URL: URL where more information can be found about the artwork.
- Tags: You can select multiple tags from a list. If someone searches based on tags, your collection can appear based on these tags.
- License: you can select a license for your NFT (e.g. whether it is for private use only or whether it can also be used commercially)
- Collection: here you choose the collection you just created.
- Traits: Here you can enter the different characteristics. You can create several. For example color, eyes, coat, background,…
- NSFW: you can check this if your NFT contains explicit content.
As soon as you upload a preview and the artwork, there is a storage cost that you will have to pay. For the artwork I uploaded myself, it was 0.00128617 SOL. For the preview 0.00013208 SOL.
Once you have filled in the form, you can click on “Mint NFT”. The file is then uploaded to Solsea. you still need to sign this transaction.
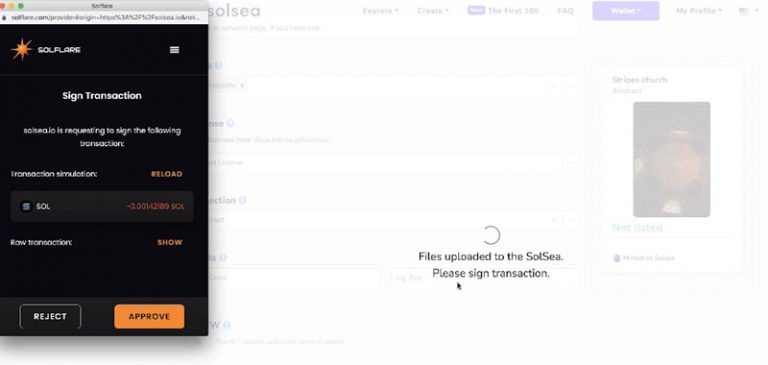
If everything is successful, you will see the message “Congratulations”.
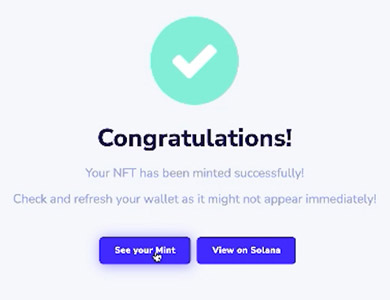
If you click on “See your mint” you will go to the page that contains your NFT.
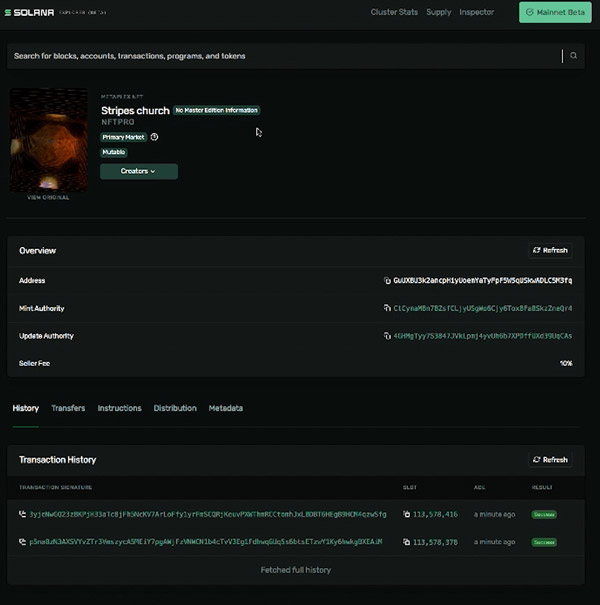
If you click on “View on Solana” you will see the transaction in the blockchain.
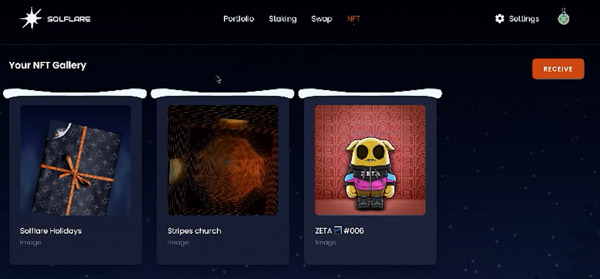
If you now look in your wallet (in this example Solflare), you will also see your NFT there.
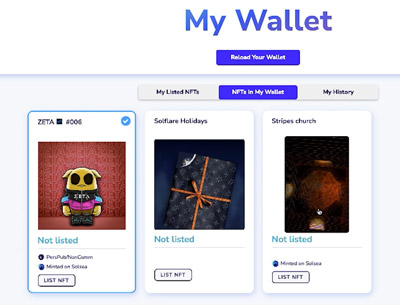
If you look in Solsea at Wallet – NFTs in my wallet, you will also see your created NFT there.
Sell your created NFT
You can just keep the created NFT in your wallet for yourself or you can choose to sell it. To do this, click on “List NFT”. You can now enter an amount in the SOL currency that you would like to receive for it. This has to be sent back to the blockchain for which you have to pay a small transaction fee. In my case, it was 0.00409355 SOL. You can approve this via your wallet by clicking on “Approve”.
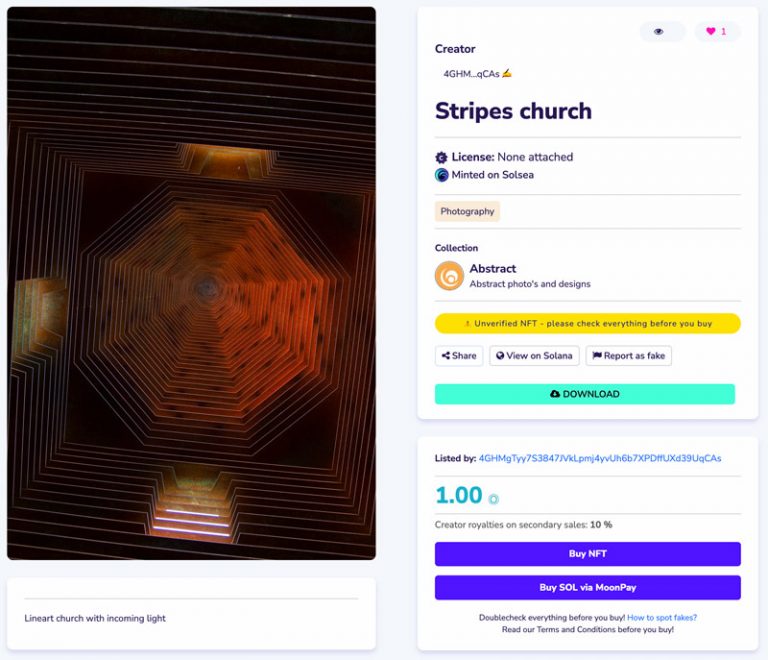
The NFT will then disappear from your wallet and will be found under “My listed NFTs”.
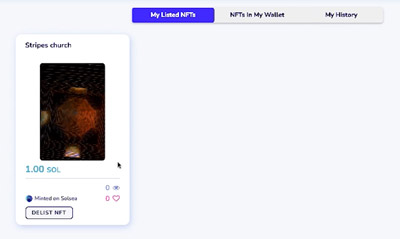
Here you will find my created NFT. You can always give this one a like 😉
Have you ever made and/or sold an NFT? Are you going to convert your artwork to NFTs? Feel free to share your experience or search in a comment at the bottom of this page.